Descriptive Flexfields (DFFs) in Oracle Cloud ERP allow organizations to extend Oracle’s standard functionality by adding custom fields to various objects in financial applications. This guide explains how to add a new Descriptive Flexfield (DFF) in the Payables module or other domains like General Ledger.
Accessing the “Manage Payables Descriptive Flexfields” Task
To configure a new DFF, users need to navigate to Setup and Maintenance and search for the task “Manage Payables Descriptive Flexfields.”
To do this:
- Go to Navigator > Setup and Maintenance.
- In the search task field, type
Descriptiveand select “Manage Payables Descriptive Flexfields” from the results for payables or Manage General Ledger Descriptive Flexfields for GL.
To access this task, a user must have Application Implementation Consultant or IT Security Manager role, which provides access to setup and maintenance functions, including configuring flexfields.
Objects Available for Descriptive Flexfields
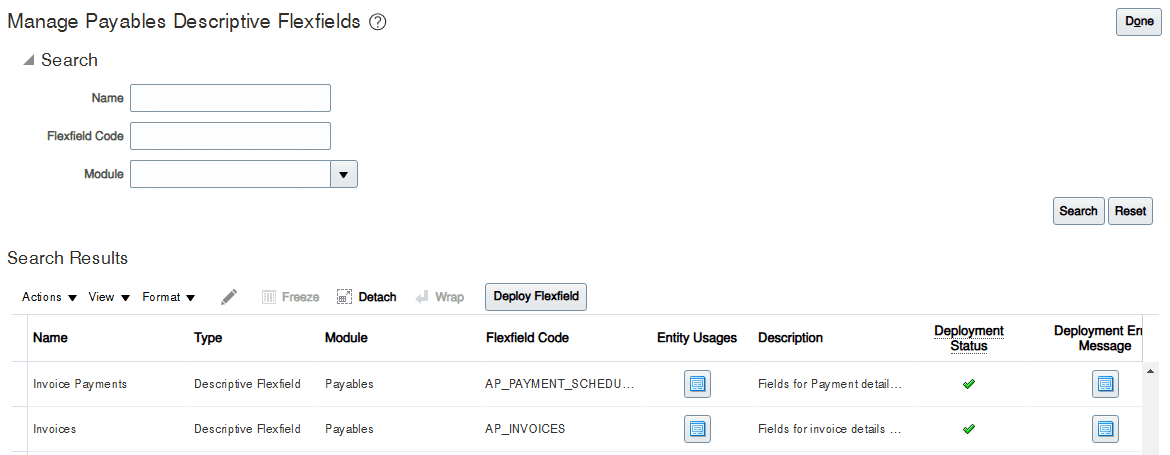
Once inside the “Manage Payables Descriptive Flexfields” screen:
- Use the Search function to list all available objects.
- For example if you want to add a flexfield to AP_INVOICE_DISTRIBUTIONS:
- Select it and click the edit (pencil) icon.
- Click the “+” button to add a new segment.
Creating a New Segment in a Descriptive Flexfield
Understanding the “Create Segment” Screen
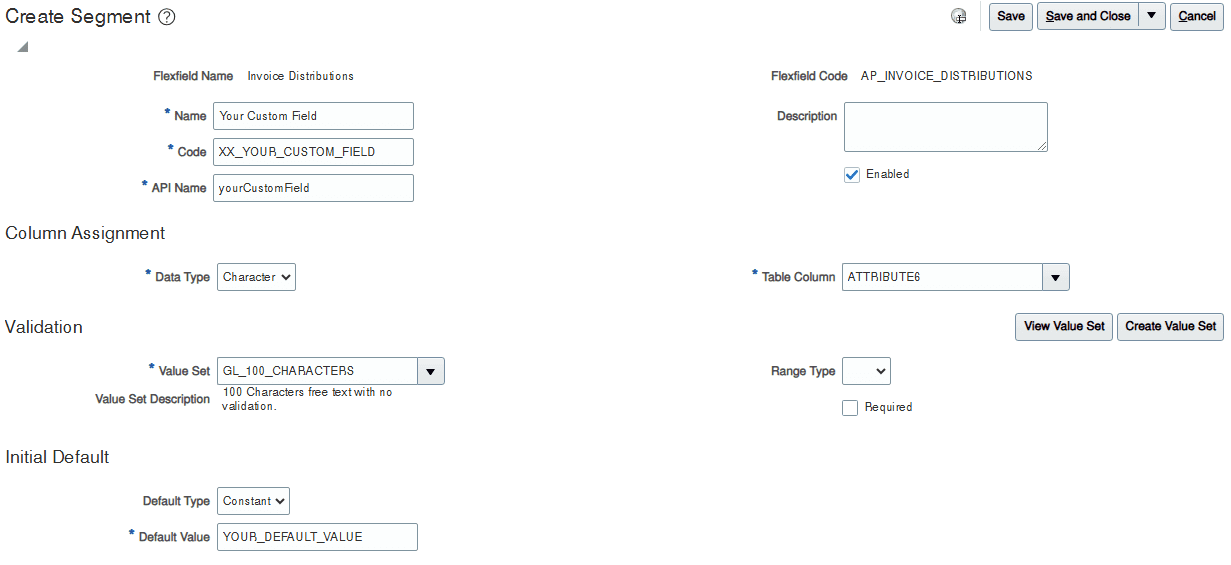
Each field in the “Create Segment” screen serves a specific function. Below is a breakdown:
| Field | Description |
|---|---|
| Flexfield Name | Displays the name of the selected flexfield (e.g., Invoice Distributions). |
| Flexfield Code | Displays the technical identifier of the flexfield (e.g., AP_INVOICE_DISTRIBUTIONS). |
| Name | Enter a name for the custom field (e.g., Your Custom Field). |
| Code | Enter a unique identifier (e.g., XX_YOUR_CUSTOM_FIELD). |
| API Name | Enter an API reference for the field (e.g., yourCustomField). |
| Description | Optional description of the field. |
| Enabled | Checkbox to enable the segment. |
| Data Type | Select the type of data (Character, Number, Date, etc.). |
| Table Column | Choose which database column will store the value (e.g., ATTRIBUTE6). |
| View Value Set | Allows viewing existing value sets. |
| Create Value Set | Allows creating a new value set for validation. |
| Value Set | Select a predefined value set if required. |
| Value Set Description | Displays the description of the selected value set. |
| Range Type | Defines if the values are limited to a range. |
| Required | Checkbox to make the field mandatory. |
| Default Type | Selects how the field is defaulted (Static, Profile, SQL, etc.). |
| Prompt | Label shown on UI (e.g., Your Custom Field). |
| Display Type | Select the field type (Text Box, Drop-down, etc.). |
| Display Size | Set the width of the input field. |
| Display Height | Set the height of the input field (for multiline text). |
| Read-only | Checkbox to prevent users from editing the field. |
| Definition Help Text | Provides guidance when setting up the field. |
| Instruction Help Text | Provides help for end-users. |
| BI Enabled | Enables the field for OTBI reports. |
| BI Label | Defines the label to be used in OTBI. |
Manage Segment Labels for OTBI
To make the new flexfield available in Oracle Transactional Business Intelligence (OTBI):
- Navigate to Setup and Maintenance.
- Search for “Manage Segment Labels.”
- Assign an appropriate label to your flexfield to allow reporting.
Deploying the Flexfield
Once the configuration is complete:
- Click “Deploy Flexfield.”
- Select the object where the flexfield was added (e.g., AP_INVOICE_DISTRIBUTIONS).
- Click Deploy Flexfield to deploy the changes.
Adding a Descriptive Flexfield (DFF) in Oracle Cloud ERP enhances system functionality by allowing additional data capture. By following these steps, users can create, configure, validate, and deploy new flexfields for Payables or General Ledger, ensuring flexibility and better data management.