Auditing in Oracle Fusion Cloud ERP provides a powerful mechanism for tracking the full change history of critical business objects. By enabling auditing, you can capture create, update, and delete operations on selected attributes of objects such as journals, journal batches, and journal lines. This enables you to:
- Maintain an immutable record of changes for compliance and internal control
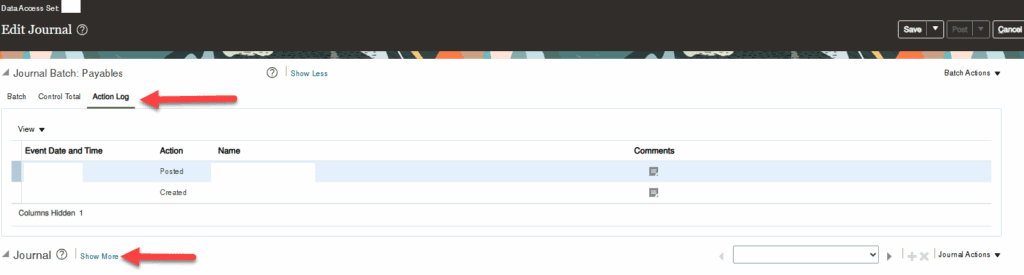
- Diagnose and report on “missing” transactions (e.g., journals created and then deleted prior to posting)
- Build BI Publisher or SQL reports to analyze historical data across any date range
In this article, we’ll walk through, step by step, how to activate the audit tables for General Ledger journal batches, headers, and lines, and then how to query those audit tables in Oracle Cloud SQL or BI Publisher.
1. Prerequisites
- User Role and Privileges
You must be signed in with a user profile that has the Application Administrator role or equivalent. In particular, ensure you have the Manage Audit Policies (FND_MANAGE_AUDIT_POLICIES_PRIV) privilege enabled. - Understand Audit Concepts
Auditing is disabled by default. Selecting objects and attributes simply configures what to audit; setting the audit level to Auditing actually enables the audit engine to start capturing events. - Plan Your Audit Scope
Decide which business objects (e.g., Journal Batch, Journal Header, Journal Line) and which attributes (e.g., Batch Name, Status, Accounting Date, Debit Amount) you wish to track. Note that BLOB/CLOB attributes and rich/long text cannot be audited.
2. Configuring Audit Policies
2.1 Navigate to Manage Audit Policies
- Sign in to Oracle Fusion with your Application Administrator user.
- From the global Setup and Maintenance menu, select:
- Offering: Financials
- Functional Area: Common Implementation
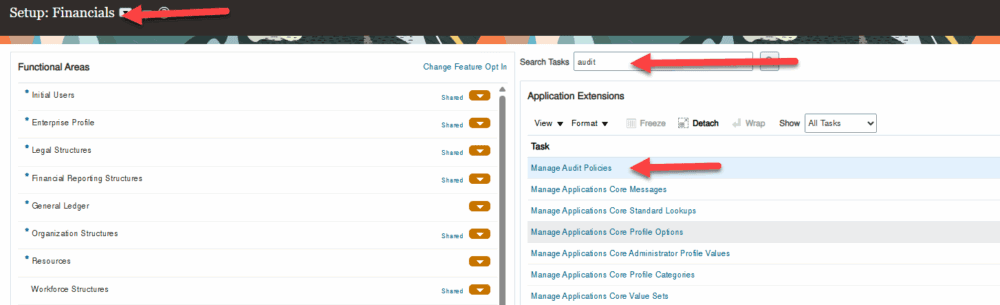
- Task: Manage Audit Policies
- Click Go to Task. This opens the Manage Audit Policies page, where you can both configure objects/attributes and set the global audit level.
2.2 Configure Business Object Attributes
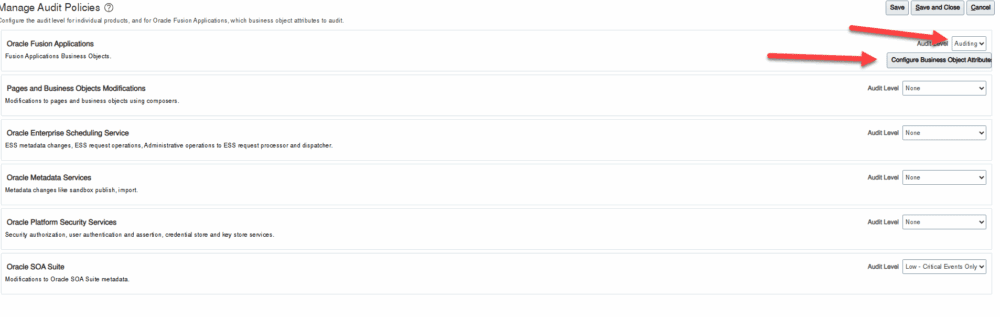
- On Manage Audit Policies, expand the Oracle Fusion Applications section and click Configure Business Object Attributes.
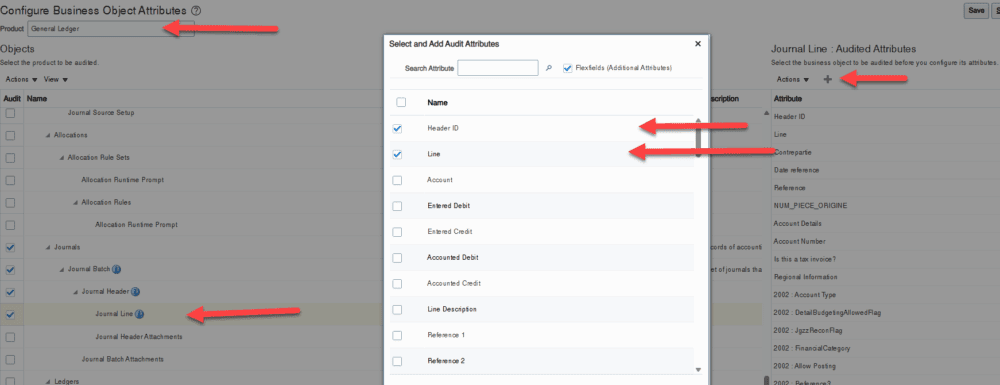
- On the Configure Business Object Attributes page, use the Product dropdown to select General Ledger.
- In the tree on the left, expand Journals → Journal Batch, Journal Header, and Journal Line.
- For each object:
- Select the object node (e.g., Journal Header).
- In the Audited Attributes panel on the right, click the + Add icon.
- In the Select and Add Audit Attributes dialog, select the specific attributes you want audited (e.g., Accounting Date, Status, Deleted Flag) and click OK
- Repeat for all three objects (batch, header, line).
- When done, click Save and Close to return to Manage Audit Policies.
Tip: All attributes are selected by default when you expand an object. You can deselect any you don’t wish to audit. If you remove an attribute, it will no longer be audited. Even if the parent object remains selected.
3. Enabling Auditing
Once the objects and attributes are configured, you must turn on auditing for the application:
- Back on the Manage Audit Policies page, locate the Audit Level dropdown (top of page).
- Change Audit Level from None to Auditing.
- Click Save and Close.
This activates the audit engine; from this point forward, all operations (create/update/delete) on the configured attributes will be logged in the audit tables
Note: Auditing only captures events occurring after the audit level is set to auditing. Past changes are not backfilled. Also, when you later set Audit Level back to None, auditing stops from that moment onward. Historical data remains in the audit tables, but no new events are recorded.
4. Audit Table Naming and Structure
Once auditing is enabled, audit records are written to database tables whose names mirror the base objects, suffixed with an underscore (_). For example:
| Base Table | Audit Table |
|---|---|
GL_JE_BATCHES | GL_JE_BATCHES_ |
GL_JE_HEADERS | GL_JE_HEADERS_ |
GL_JE_LINES | GL_JE_LINES_ |
Each audit table has the same standard set of columns as the default tables.
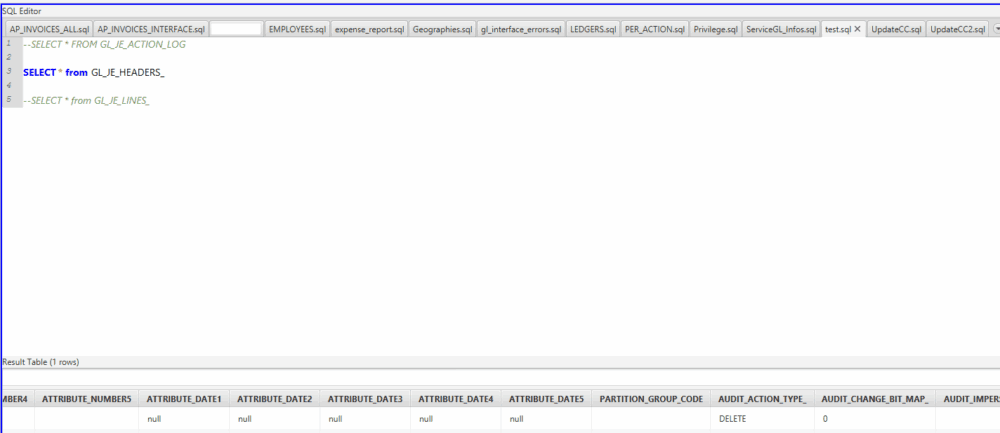
5. Querying Audit Tables
With the audit tables in place, you can build SQL Queries running on a desktop SQL tool like Oracle Cloud SQL Studio or BI Publisher data models to extract change history.
6. Best Practices & Considerations
- Record the exact dates when you enable/disable auditing. Any events outside those dates won’t appear in history.
- Auditing every attribute can lead to large tables and performance impact. Only audit attributes critical to your control objectives (e.g.,
STATUS,DELETED_FLAG,ACCOUNTED_DR)
Activating and querying audit tables for General Ledger journals in Oracle Fusion Cloud ERP empowers organizations with:
- Comprehensive change tracking for create, update, delete events
- Enhanced reporting for compliance, audit, and forensic analysis
- Self-service insights via BI Publisher or Analytics Dashboards
By following the steps above, configuring business object attributes, enabling audit at the global level, and building targeted SQL/BI queries. You can unlock rich historical data that safeguards financial integrity and provides transparency into your ERP environment.