The Oracle Expense Assistant, a component of the Oracle Fusion Applications Digital Assistant, enables users to manage expenses through conversational interfaces. Integrating this assistant with Microsoft Teams allows employees to perform expense-related tasks directly within their collaboration environment, enhancing efficiency and user experience.
This guide provides a detailed, step-by-step approach to configuring and deploying the Oracle Expense Assistant within Microsoft Teams.
1. Prerequisites
Before initiating the integration, ensure the following prerequisites are met:
1.1 Oracle Fusion Cloud Requirements
- Oracle Expenses Activation: Confirm that Oracle Expenses is enabled in your Oracle Fusion Cloud Applications environment.
- Oracle Digital Assistant (ODA) Access: Ensure access to ODA within your Oracle Cloud Infrastructure (OCI) tenancy.
- Provisioned ODA Instance: Verify that your ODA instance is active and integrated with Fusion Applications.
- Administrative Privileges: Obtain administrative rights to manage Digital Assistant roles and configurations.
- Oracle Identity Cloud Service (IDCS) Credentials: Required for authenticating ODA with Microsoft Teams.
1.2 Microsoft Teams Requirements
- Microsoft 365 Tenant: An active tenant with Microsoft Teams enabled.
- Administrative Access: Permissions to manage Microsoft Azure and Bot Framework for bot registration.
- Bot Registration: Capability to register a bot in Microsoft Azure Bot Services.
- App Service Configuration: Ability to set up an App Service in Azure to facilitate communication between ODA and Microsoft Teams.
1.3 User Roles and Access
Assign appropriate roles to users interacting with the Oracle Expense Assistant:
| User Role | Responsibilities |
|---|---|
| ODA Service Administrator | Full access to configure, deploy, and manage Oracle Digital Assistant. |
| ODA Service Developer | Authority to modify and test ODA skills, intents, and responses. |
| ODA Business User | Access to analytics and basic skill testing without modification privileges. |
2. Configuring Oracle Digital Assistant for Expense Management
Oracle provides a preconfigured Expense Assistant skill that integrates seamlessly with Fusion Expenses.
Step 2.1: Accessing the Oracle Digital Assistant Environment
- Log in to Oracle Cloud Console:
- Navigate to https://cloud.oracle.com.
- Enter your OCI credentials.
- Access Identity & Security > Domains.
- Locate and open your ODA instance.
- Verify Digital Assistant Subscription:
- Ensure your ODA instance is active.
- Confirm that Fusion Applications integration is enabled.
- Check ODA Service Roles:
- Navigate to Identity Cloud Service (IDCS).
- Assign relevant ODA roles to users as needed.
Step 2.2: Installing the Predefined Expense Assistant
- Access the Skill Store:
- In the ODA Console, navigate to Development > Skill Store.
- Search for “Expense Assistant”.
- Select the version that matches your Fusion Applications release.
- Install the Expense Assistant Skill:
- Click Pull to add the skill to your ODA instance.
- Verify the installation under Development > Skills.
Step 2.3: Training the Digital Assistant
- Open the Expense Assistant:
- Navigate to Development > Digital Assistant.
- Select the Expense Assistant skill.
- Initiate Training:
- Click the Train button in the navigation bar.
- In the Train dialog box, select Trainer TM as the model.
- Click Submit and wait for the training process to complete.
Training enhances the assistant’s ability to understand and process expense-related queries effectively.
3. Integrating Oracle Digital Assistant with Microsoft Teams
Integrating ODA with Microsoft Teams involves creating a communication channel that allows users to interact with the Expense Assistant directly within Teams.
Step 3.1: Creating a Microsoft Teams App and Bot
To enable Microsoft Teams as a channel for Oracle Digital Assistant, you need to register a bot in Microsoft Azure, create an App in Microsoft Teams, and configure it to communicate with ODA.
Step 3.1.1: Registering the Bot in Microsoft Azure
- Sign in to Microsoft Azure Portal
- Go to https://portal.azure.com.
- Sign in with an administrator account.
- Navigate to Azure Bot Services
- In the Azure Portal, search for “Azure Bot Services” in the top search bar.
- Click Create a Bot.
- Configure the Bot Registration
- Bot Name: Enter a meaningful name (e.g., OracleExpenseBot).
- Subscription: Select the appropriate Azure subscription.
- Resource Group: Create a new resource group or use an existing one.
- Pricing Plan: Select F0 (Free) for testing or S1 (Standard) for production.
- Click Create and wait for the bot to be deployed.
- Obtain the Bot ID and Credentials
- Once deployed, navigate to Settings > Configuration.
- Copy the Microsoft App ID (you’ll need this later).
- Click Manage Passwords and generate a new secret key. Copy and save this key securely.
- These credentials will be required to link the bot to ODA.
Step 3.1.2: Creating an App in Microsoft Teams Developer Portal
- Access the Teams Developer Portal
- Go to https://dev.teams.microsoft.com/home.
- Log in with your Microsoft account.
- Create a New App
- Click Apps in the left navigation menu.
- Click + New app and provide the following details:
- App Name: Oracle Expense Assistant
- App ID: Leave this blank (it will be generated later).
- Short description: “An assistant to manage and track expenses in Oracle Cloud.”
- Developer information: Enter the required organization details.
- Click Save.
- Add a Bot to the App
- In the left menu, click App Features > Bot.
- Click Create a new bot.
- Provide the following details:
- Bot Name: OracleExpenseBot
- Microsoft App ID: Use the App ID copied from Azure Bot Services.
- Scope: Select Personal and Team (to allow both individual and team-wide interactions).
- Select “My bot supports uploading and downloading files” (if receipts need to be uploaded).
- Click Save.
- Configure the Messaging Endpoint
- In the bot settings, go to Configuration.
- Set the Messaging Endpoint to: https://ODA-instance/connectors/v1/tenants/tenant-ID/channels/microsoft/teams/messages
- Replace
<ODA-instance>and<tenant-ID>with your Oracle Digital Assistant instance details.
- Save and Publish the App
- Click Save and then Publish the app.
- The app will now be available within Microsoft Teams.
Step 3.2: Configuring Oracle Digital Assistant to Connect with Microsoft Teams
Once the bot is registered and the Teams app is created, you need to configure Oracle Digital Assistant to use Microsoft Teams as a channel.
- Open Oracle Digital Assistant Console
- Go to Oracle Cloud Console > ODA Service.
- Create a New Channel for Microsoft Teams
- Navigate to Development > Channels.
- Click Add Channel.
- In the Create Channel dialog:
- Channel Type: Select Microsoft Teams.
- Channel Name: Expense Assistant Teams
- Microsoft App ID: Paste the Microsoft App ID from Azure.
- Client Secret: Paste the secret key from Azure Bot Services.
- Bot Token Endpoint: Use the messaging endpoint configured earlier.
- Click Save & Close.
- Test the Connection
- In the ODA Console, go to Test Bot.
- Send a test message (e.g., “Create an expense report for my trip.”).
- The bot should respond, confirming that it’s properly connected.
4. Using Oracle Expense Assistant in Microsoft Teams
Once configured, Microsoft Teams users can interact with Oracle Digital Assistant for expense management.
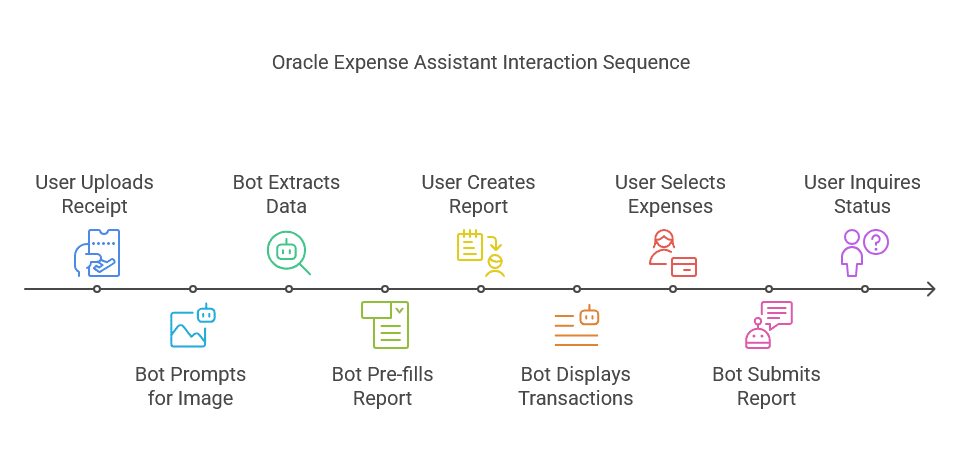
4.1 Uploading Receipts
User Input:
“Upload a receipt for my taxi expense.”
Bot Response:
Prompts the user to attach an image of the receipt.
Extracts relevant data using OCR (Optical Character Recognition).
Pre-fills the expense report.
4.2 Submitting an Expense Report
User Input:
“Create an expense report for my London trip.”
Bot Response:
Displays recent transactions related to the trip.
Allows the user to select expenses to include.
Submits the report for approval.
4.3 Tracking Expense Status
User Input:
“What is the status of my reimbursement?”
Bot Response:
Fetches approval workflow status.
Displays expected payment date.
4.4 Modifying or Deleting Expenses
User Input:
“Remove the Starbucks expense from my last report.”
Bot Response:
Locates the specific transaction.
Confirms before deleting it.
5. Deployment and Rollout
Before rolling out Oracle Expense Assistant to all employees, conduct thorough testing and pilot deployments.
5.1 Internal Testing
- Use the ODA Testing Console to simulate queries.
- Verify that intent recognition and response accuracy meet business needs.
5.2 Pilot Deployment
- Deploy to a small group of users in Microsoft Teams.
- Gather feedback on usability and error handling.
- Fine-tune responses based on real-world interactions.
5.3 Organization-Wide Deployment
- Publish the Bot in Microsoft Teams Admin Center
- Navigate to Microsoft Teams Admin Center.
- Approve and deploy the app to the entire organization.
- Assign Permissions and Policies
- Ensure appropriate security policies are applied.
- Restrict access to specific user groups if necessary.
- Distribute the Teams Bot Link to Employees
- Send internal communications with usage instructions.
- Provide FAQs and training material to encourage adoption.
By integrating Oracle Expense Assistant with Microsoft Teams, organizations can provide employees with a seamless, AI-driven experience for managing expenses. This solution improves efficiency, reduces manual errors, and enhances compliance with corporate policies.