This guide explains how to integrate Azure Active Directory (Azure AD) with Oracle Cloud Infrastructure (OCI) using Oracle Identity Cloud Service (IDCS) as the mediator. By configuring SAML 2.0–based Single Sign-On (SSO), your users can log in to Oracle Cloud using their Azure AD credentials.
Disclaimer:
This tutorial is valid as of 2023. As cloud services evolve rapidly, steps and screen layouts may change over time. Please refer to the latest documentation from Microsoft Azure and Oracle Cloud for the most current procedures.
Prerequisites
- Access to Azure Portal: You must have administrative access to your Azure AD.
- Oracle Cloud and IDCS Admin Access: Ensure you have the necessary privileges to modify Identity Providers and SSO settings.
- Basic Understanding of SAML 2.0: Familiarity with SAML concepts (e.g., assertions, certificates, endpoints) will help troubleshoot issues.
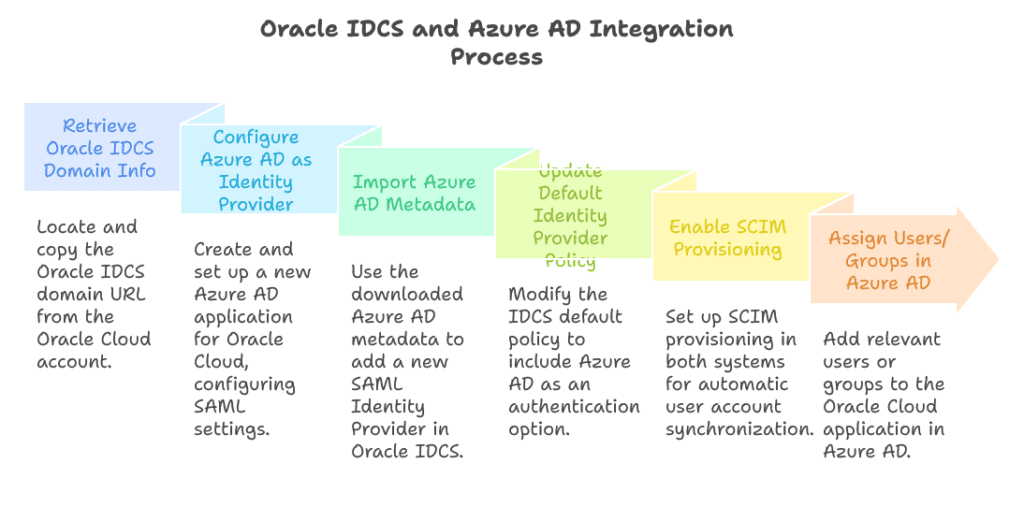
Step 1: Retrieve Your Oracle IDCS Domain Information
Before configuring Azure AD as an Identity Provider (IdP) in Oracle IDCS, you need your Oracle IDCS domain URL.
- Log in to your Oracle Cloud account.
- Navigate to: Identity & Security > Domains
- Select your domain (for example,
fa-YOUR_ORACLE_POD-test-XXXX). - Click on the Overview tab.Click Show next to Domain URL and copy the URL.
Example URL:https://idcs-8219324c3744a47329fhdB890db77f9b1234.identity.oraclecloud.com:443
Step 2: Configure Azure AD as an Identity Provider
2A. Create an Azure AD Application
- Log in to the Azure portal.
- Navigate to: Azure Active Directory > Enterprise Applications
- Click New Application.
- In the Application Gallery, search for Oracle Cloud Infrastructure and create a new instance.
- Open the newly created application and select Single Sign-On
- .Choose SAML as the authentication method.
2B. Configure SAML Settings in Azure AD
- Basic SAML Configuration:
- Identifier (Entity ID): Set this to the Oracle IDCS SAML Provider ID. (You can retrieve this value from the IDCS metadata file in a later step.)
- Reply URL (Assertion Consumer Service URL): https://IDCS_Host/fed/v1/sp/sso (Replace
<IDCS_Host>with your actual IDCS host name.)
- User Attributes & Claims:
- Ensure the User Identifier is set to
user.mail(or match it to your Oracle user attribute, e.g., email address). Or any other user identifier you want to use, like the user login. - (Optional) Map additional attributes (e.g., first name, last name, etc) if required by your organization.
- Ensure the User Identifier is set to
- Certificate & Metadata:
- Download the Azure AD metadata XML file for later use in IDCS.
- Note the SAML signing certificate details; these may be required for troubleshooting or future updates.
Step 3: Import Azure AD Metadata into Oracle IDCS
3A. Add a New SAML Identity Provider in IDCS
- Log in to the Oracle IDCS Admin Console.
- Navigate to: Identity Providers
- Click Add IdP > Add SAML IdP.
- Configure the new IdP:
- Name: Enter “
Azure AD“. - Upload Metadata: Use the XML file you downloaded from Azure AD.
- Name: Enter “
- User Mapping:
- Set the Requested NameID Format to
Email Address(or as required). - (Optional) Configure additional attribute mappings if needed.
- Set the Requested NameID Format to
- Click Activate.
Step 4: Update the Default Identity Provider Policy in IDCS
To make Azure AD available as an authentication option or the sole option:
- In the IDCS Admin Console, navigate to: Security > IdP Policies
- Select Default Identity Provider Policy and click Edit.
- Under Assign Identity Providers, click Add and select Azure AD.
- (Optional) Include Username-Password as a fallback option if needed. Do not include this in Production if you want to have the SSO as the sole option to login
- Click Save.
Step 5: Enable SCIM Provisioning
SCIM provisioning allows for automatic user synchronization between Azure AD and Oracle IDCS.
5A. Configure the Target SCIM Provisioning in IDCS
- In the Oracle IDCS Admin Console, navigate to: IAM > Add Application
- Select Confidential Application and click Launch Workflow.
- Name the application (e.g.,
Target SCIM Provisioning) and click Next. - In OAuth Settings:
- Enable Client Credentials.
- Enable Add App Roles.
- Assign the User Administrator role.
- Save and record the Client ID and Client Secret.
5B. Set Up SCIM Provisioning in Azure AD
- Encode the Credentials:
- Combine the Client ID and Client Secret (typically in the format
ClientID:ClientSecret) and encode in Base64. - (Tip: Use an online Base64 encoder or the command line, e.g.,
echo -n "ClientID:ClientSecret" | base64.)
- Combine the Client ID and Client Secret (typically in the format
- In the Azure portal, navigate back to your Oracle Cloud Enterprise Application.
- Go to the Provisioning section.
- Enter the SCIM endpoint URL (this will be provided by IDCS) and paste the encoded token.
- Enable SCIM provisioning.
- Save your configuration.
Step 6: Assign Users or Groups to the Oracle Cloud Application in Azure AD
- In the Azure portal, navigate to: Azure Active Directory > Enterprise Applications
- Select your Oracle Cloud Application.
- Click Users and Groups > Add User.
- Assign the relevant users or groups that should have access to Oracle Cloud.
- I recommend adding groups so that you can give Oracle Roles to a grouped user population in IDCS and not one by one.
Step 7: Validate the SSO Integration
- Open a browser and navigate to your Oracle IDCS user portal: https://idcs-your-IDCS-instance.identity.oraclecloud.com/ui/v1/myconsole
- Confirm that the Azure AD login button appears. Or that you are directly connected if Azure AD is the sole option.
- Click the button and log in using an Azure AD account.
- Successful authentication should redirect you to Oracle Cloud.
Troubleshooting Tip: If the SSO button or login does not work as expected, verify:
- The Azure AD metadata and certificate are correctly imported in IDCS.
- The default IdP policy includes Azure AD.
- The user attributes (especially the email/NameID) match between Azure AD and Oracle IDCS.
Step 8: Configure IDCS as an Identity Provider for Oracle Fusion Cloud
For organizations using Oracle Fusion Cloud Applications, IDCS can be configured as the IdP.
8A. Generate IDCS Metadata
- Log in to the IDCS Admin Console.
- Navigate to: Settings > Default Settings
- Enable the Access Signing Certificate.
- Download the metadata XML from: https://YOUR_IDCS_INSTANCE.identity.oraclecloud.com/fed/v1/metadata
8B. Configure Oracle Fusion Cloud SSO
- Log in to Oracle Fusion Cloud as an administrator.
- Navigate to: Security Console > Single Sign-On
- Click Create Identity Provider.
- Upload the IDCS metadata XML.
- Save the configuration.
By following these steps, you have integrated Azure AD with Oracle Cloud via IDCS.
This configuration not only streamlines the user authentication process but also enhances security by centralizing identity management.