When importing payable invoices via the file‐based data import interface in Oracle Cloud Financial ERP, data issues can sometimes cause the process to fail. In these situations, residual records remain in the interface table, preventing a clean restart of the import with corrected data. Purging these failed imports is essential to reset the system and avoid duplicate or corrupt entries. This guide will walk you through how to purge payable invoices using the ESS Schedule processes, what roles are required, and a breakdown of the key parameters involved.
Why Purge Failed Invoice Imports?
When an import fails due to errors in the file-based data (such as formatting issues or data mismatches), the failed records can block subsequent attempts. Purging the pending records from the interface table clears the slate, enabling the corrected data file to be re-imported successfully. This purge is particularly important to maintain data integrity and ensure smooth downstream processing of financial transactions.
Navigating to the ESS Schedule Processes
To initiate the purge, log in to Oracle Cloud Financial ERP with a user that holds an administrative or technical role (often designated as an admin technique role). These roles are critical since the purge process directly affects the core financial data. Once logged in:
- Navigate to the Tools menu.
- Select Scheduled Processes. This is where you manage and execute various background jobs.
- Click on Schedule New Process and search for the job named “Purge Interface Tables”.
Finding the Purge Interface Tables Job
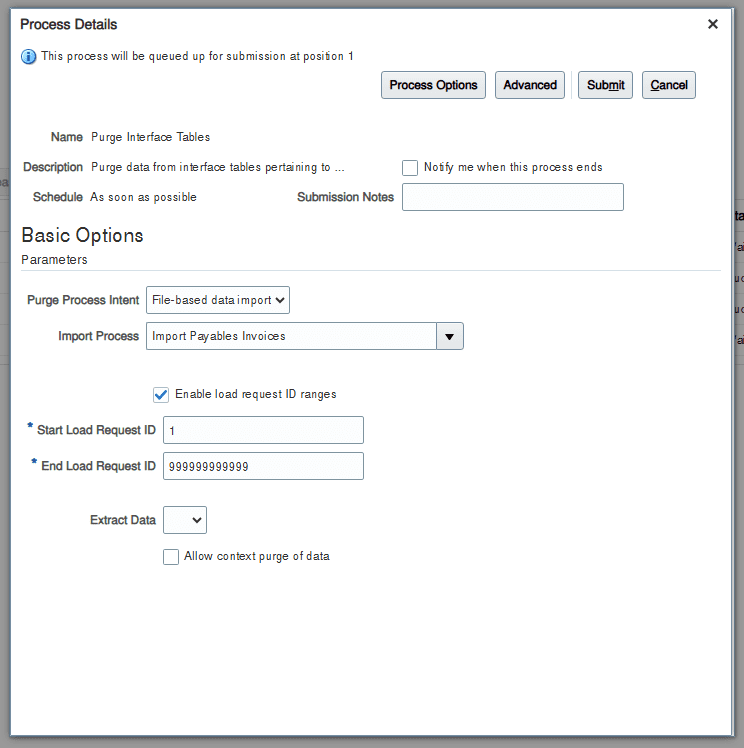
After accessing the Scheduled Processes screen, locate the “Purge Interface Tables” process. This job is designed to remove all stale or error-prone data from the interface tables.
Understanding the Key Parameters
When scheduling the purge process, you need to configure several parameters carefully:
- Purge Process Intent: Set this to “File based data import.” This parameter specifies that the purge applies only to data coming through the file-based import interface.
- Import Process: Choose “Import Payable Invoices.” This ensures that only the payable invoice import records are targeted.
- Enable Load Request ID Ranges: This should be set to “true.” By enabling ranges, you define the scope of the purge.
- Start Load Request ID: Set this to 1. This value marks the beginning of the ID range.
- End Load Request ID: Enter 9999999999. This upper limit ensures that every load request within the possible range is purged.
These settings guarantee that the system will clear all pending records from the file-based interface, providing a clean environment for re-importing the corrected invoice data.
Purging failed payable invoice imports is a vital step when errors occur in the file-based data import process. By following the above steps, navigating to the ESS Schedule processes, verifying your administrative role, locating the “Purge Interface Tables” job, and correctly setting the purge parameters, you can ensure that your financial data remains accurate and that the system is ready to process new, error-free data. This proactive approach not only prevents import errors from cascading into other areas but also supports ongoing financial accuracy in Oracle Cloud Financial ERP.